- Home
- Our Story
-
Past Events
- Up Coming Events
-
Photos
- June in Sacramento 2023
- As seen at a local Cruise-In
- Prisoners of Time
- 1962 Budd XT Bird
- 1961 Buick Flamingo
- 1916 Gas Prices
- Ford History Video
- Consumer Reports
- Fords of the 1950's
- 57-58 Thunderbird
- Driving to Wichita 2006
- Circus Party at 2008 International Convention
- Working on members' cars
- 1957 Rebuild
- Contact Us
- Join Us
-
Tech Tips
- Preparing for winter storage
- Cooling System >
- Electrical >
- Slide Shows >
- Cleaning Tips
- Valve Adjust tip
- 1955 Shop Manual error
- Turning Rotors
- Welding around Brake Cleaner
- Paint on Chrome
- Wind Wing Glass Removal
- Automatic Transmission Removal
- Arm Protection
- Changing the Fuel Pump
- Rusty Lug Nuts
- Local Parts availability
- Club Store
- Bird Watcher
- Cruise-Ins
- Auto Service Recommendations
Turn Signal Switch problems
Copied from Trail Birds of Florida news letter
Picture 1 Picture 2
__
Turn Signal Trouble Shooting
By Gene Nelson
It seems like every time we have a Tech Session there is someone with a turn signal problem. The three most common problems are (1) the turn signals will not off after you complete your turn, (2) the turn signals will not stay engaged and turn off before you make your turn, and (3) the turn signal turns off after the turn but does not return to its center position. When the turn signal fails to return to the center position your brake lights stop working on one side – the side where the turn signal was last positioned.
The fix for each of these problems is fairly simple and something that most members can do for themselves. Getting to the mechanism involves removing the steering wheel. Once the steering wheel is off you will have access to the turn signal mechanism and will be able to correct the problem. It requires a steering wheel puller to remove the steering wheel. See details for this in your Thunderbird Shop Manual.
The repair for each of these problems is different, so we need to look at them one at a time.
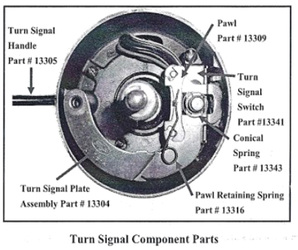
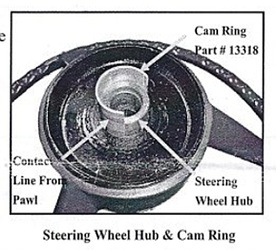
Problem #1 (see picture #1) When the turn signals fail to cancel after a turn it is due to either a worn pawl (part #13309) or a worn cam ring (part #13318) on the bottom of the steering wheel (picture 2). Both parts may be worn and in need of replacement. These parts are available from the Thunderbird suppliers at a reasonable price.
To replace the pawl first you need to remove the conical spring (part #13343) which is held in place by the groove in the turn signal switch center pin (part #13341). It is easily removed with a small screwdriver or pick by pulling it up and off the top of the pin. Once the conical spring is removed, remove the run signal handle (part #13305) by turning it counterclockwise. Now the plate assembly (part #13304) can be removed from the steering column. With the plate removed the pawl is accessible and can be replaced easily. Simply release the retaining spring, position the new pawl and reset the spring. To reinstall the plate assembly simply reverse this process to get it back in position. The tricky part will be reinstalling the conical spring. A small screw driver and a little patience will get it to snap in place. You might also consider adding a light coating of grease during assembly to the shaft where the turn signal arm is mounted.
Next the cam ring (part #13318) on the bottom of the steering wheel needs to be inspected and replaced if wear is detected. You will see a line around the circumference of the cam ring where the pawl makes contact. If this visible ring is beginning to penetrate the cam ring surface and is starting to form a groove, the cam should be replaced.
First mark the position of the cam ring opening before you start so that you will be able to reinstall it in the same place. To remove the cam ring expand it slightly with two pairs of pliers and lift the cam off of the steering wheel hub. You have two options to repair the cam ring. You can reuse the current cam ring by simply removing it and turning it over so that a fresh surface will now be in contact with the pawl. You can also replace the cam ring with a new one obtained from the Thunderbird suppliers. Once the cam ring and pawl are replaced put the steering wheel back on the column. Before you lock it down raise the front wheels off the ground and turn the wheels to check the turn signal operation in both directions. Once you have confirmed that they are working properly bolt down the steering shell and install the horn ring. You should now be ready to go with turn signals that will cancel properly after each turn.
Picture 3 Picture 4
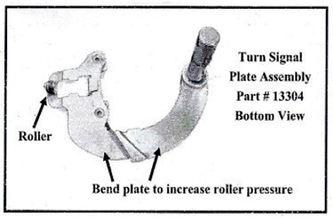
Problem #2 (see picture #3) The second problem you are likely to encounter is when the turn signals will not stay in position and cancels before you make the turn. This is most likely due to the turn signal plate assembly (part #13304) not holding the roller firmly against the turn signal detent. This is probably the easiest repair you can make to the turn signals. To correct this problem remove the steering wheel, the conical spring, and the turn signal arm.
Lift the turn signal plate assembly out of the housing. Using only hand pressure, bend the plate assembly so that it will press down harder on the detent when it is reinstalled. You only need a slight bend to provide additional pressure on the detent. Reassemble the turn signal plate assembly and insert the conical spring and turn signal arm. You can test the results by placing the steering wheel on the shaft, but do not install the nut. Check the turn signals with front wheels raised off the ground to verify that the turn signals stay in position until the turn is completed. When you return the wheel to the center position they should automatically cancel. Once you have verified that they are working properly, install the steering wheel and properly torque the retaining nut and install the horn ring.
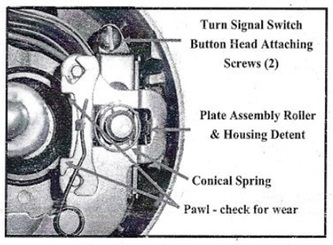
Problem #3 (all pictures) Probably the most difficult problem to diagnose and repair is when the turn signal turns off but does not return to center. When this happens the brake light on the side where the turn was last signaled will stop working. Anyone following you will only see one brake light working. To fix the problem you will need to look at several things. First check the pawl (part #13309) for wear. Rounded corners on the pawl will allow them to slip off the steering wheel cam ring and cause the turn signal plate to hang up in the top of the detent. If the corners are rounded, replace the pawl. Next check the steering wheel cam ring (part #13318) to make sure there is not a groove forming where the pawl contacts the cam ring. If you can feel a groove, replace (or turn over) the cam ring. To replace these parts use the process described for problem #1. When you replace the pawl check the turn signal plate to make sure the roller has a good downward pressure on the detent and bend the plate if necessary to increase the pressure.
One additional thing to check is the height and position of the turn signal plate assembly under the conical spring. This area of the plate assembly must be flat and evenly contact the top of the turn signal switch. If it is not sitting flat manually bend the plate until it does. Check to make sure that the two button-head screws holding the turn signal switch in position are tight. Recently I ran across a case where the wrong screw had been used to retain the turn signal switch. The screw was too long and it had the wrong head. A lock washer had been added to secure the switch causing the bolt head to protrude above the top surface of the switch. This was holding the turn signal plate assembly off of the switch and prevented it from properly contacting the steering wheel cam assembly and turn signal detent. Check these screw when working on your signals to be sure they are both the correct button-head screws.
(Editors note: I’ve observed this exact same problem being caused by white grease being applied to the mechanism. It has a tendency to dry out and become very stiff. A good cleaning was all that was necessary.)
This may seem like a lot of detail but it is well worth the time spent to get your turn signals working properly. It sounds harder than it is. These repairs are quick and easy and the parts are not expensive.


